Windows Defender is a security program that comes installed with Windows 11. It can provide you with the necessary protection to keep your computer safe. In this guide, we will provide you with steps on how to set up Windows Defender in Windows 11.
How to Check If Windows Defender Real-time Protection is Running on Your Computer
Before setting up Windows Defender, check first if Real-time protection is running on your computer, here’s how you can do it:
- Click on the Start button on the taskbar.
- Type “Windows Security” in the search bar and press Enter.
- Click on the “Windows Security” app in the search results.
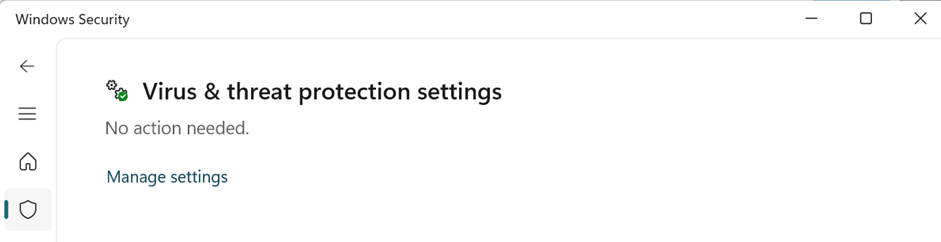
- Look for the “Virus & threat protection” section on the home page.
- Check if the Virus & threat protection settings status is “No action needed”.
Make sure the status shows “”No action needed”, if not, it means that Windows Defender Real-time protection is not running on your computer. In this case, you should enable it.
How to Enable Windows Defender Real-time Protection in Windows 11
Here are steps on how to enable Windows Defender Real-time protection:
- Click on the Start button on the taskbar.
- Type “Windows Security” in the search bar and press Enter.
- Click on the “Windows Security” app in the search results.
- Look for the “Virus & threat protection” section on the home page.
- Click on “Manage settings” under “Virus & threat protection settings”.
- Turn on the “Real-time protection” toggle switch.
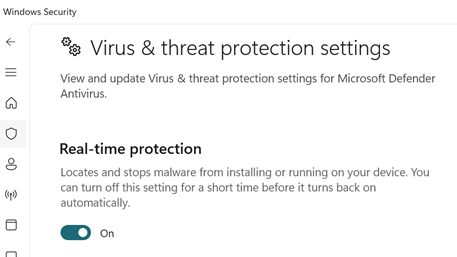
Once Windows Defender Real-time protection is enabled, your computer will start being protected in real-time.
How to Perform a Full Scan Using Windows Defender in Windows 11
Windows Defender Full Scan Future will scan all files and programs on your device, including the Windows system files, installed applications, and data files. It can detect and remove any malicious software, suspicious activity, or other potential threats.
Here are steps on how you can perform a full scan:
- Click on the Start button on the taskbar.
- Type “Windows Security” in the search bar and press Enter.
- Click on the “Windows Security” app in the search results.
- Look for the “Virus & threat protection” section on the home page.
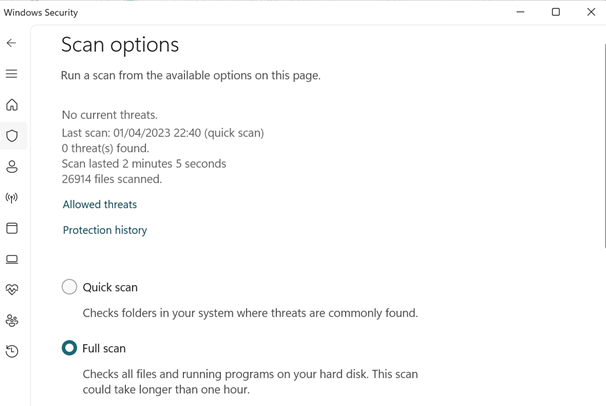
- Click on “Scan options” under “Current threats”.
- Select “Full scan” and click on “Scan now”.
- Wait for Windows Defender to scan your entire computer for malware and viruses.
- Once the scan is complete, Windows Defender will display the results. You can remove any threats by clicking on the “Start actions” button if any threats are detected.
How to Perform a Quick Scan Using Windows Defender in Windows 11
Unlike a full scan, a quick scan only checks the most critical areas of your system, such as running processes, startup items, and critical system files.
Here are steps on how you can perform a quick scan:
- Click on the Start button on the taskbar.
- Type “Windows Security” in the search bar and press Enter.
- Click on the “Windows Security” app in the search results.
- Look for the “Virus & threat protection” section on the home page.
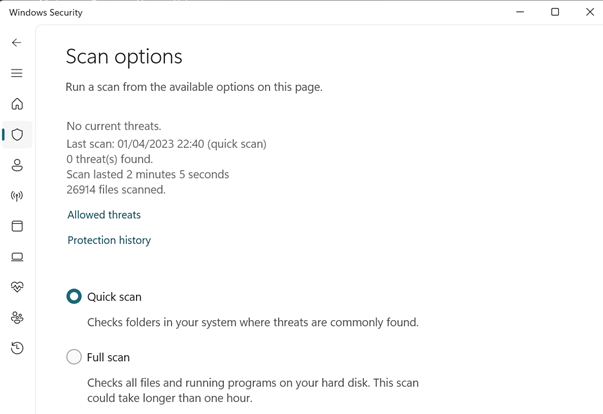
- Click on “Scan options” under “Current threats.”
- Select “Quick scan” and click on “Scan now“.
- Wait for Windows Defender to scan your computer for malware and viruses.
- Once the scan is complete, Windows Defender will display the results. You can remove any threats by clicking on the “Start actions” button if any threats are detected.
How to Schedule a Scan Using Windows Defender in Windows 11
By default, Microsoft Defender regularly scans your computer while you’re not using it so it doesn’t interfere with your work. You can also manually schedule a scan at a time and frequency that you choose.
Here are steps on how you setup Scheduled Scan:
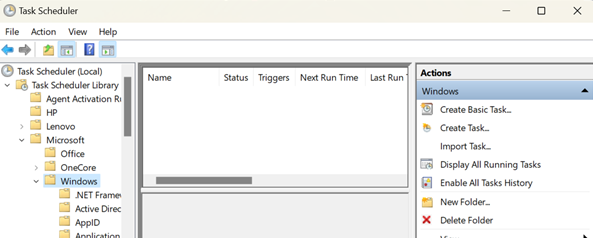
- In the search box on your taskbar, enter Task Scheduler and open the app.
- In the left pane, expand Task Scheduler Library > Microsoft > Windows.
- Then, scroll down and select the Windows Defender folder.
- In the top center pane, double-click Windows Defender Scheduled Scan
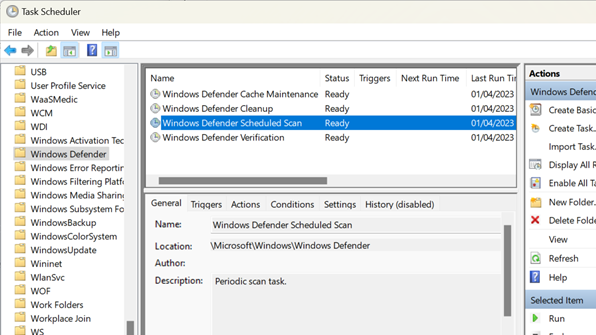
- Right-click on Windows Defender Scheduled Scan.
- Select Properties.

- In the Windows Defender Scheduled Scan Properties (Local Computer) window, select the Triggers tab, go to the bottom of the window, and then select New.

- In New Trigger windows, Specify how often you want scans to run and when you’d like them to start.

How to Exclude Files and Folders from Scans in Windows Defender
In case you want to exclude specific files or folders from being scanned by Windows Defender. Here are details steps on how you can exclude files and folders:
- Click on the Start button on the taskbar.
- Type “Windows Security” in the search bar and press Enter.
- Click on the “Windows Security” app in the search results.
- Look for the “Virus & threat protection” section on the home page.
- Click on “Manage settings” under “Virus & threat protection settings“.
- Scroll down to the “Exclusions” section and click on “Add or remove exclusions“.
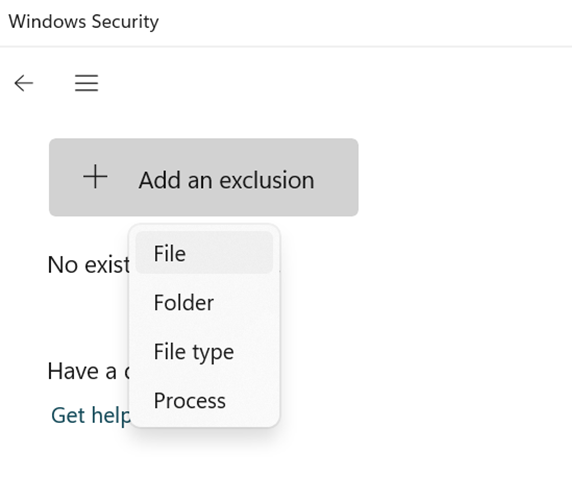
- Click on “Add an exclusion“.
- Select the type of exclusion you want to add (file, folder, file type, or process).
- Browse to the location of the file or folder you want to exclude.
- Click on “Exclude this folder” or “Exclude this file“.
How to Turn on or off Windows Defender Real-time protection in Windows 11
it’s not recommended to turn off Real-time protection in Windows 11, it will leave your devices vulnerable to malware, viruses, and other types of cyber threats.
Just in case you use a different antivirus program or if you need to troubleshoot Windows Defender issues. Here’s how you can turn off and back to Real-time protection:
- Click on the Start button on the taskbar.
- Type “Windows Security” in the search bar and press Enter.
- Click on the “Windows Security” app in the search results.
- Look for the “Virus & threat protection” section on the home page.
- Click on “Manage settings” under “Virus & threat protection settings“.
- Turn on or off the “Real-time protection” toggle switch to turn Windows Defender on or off.

How to Update Windows Defender in Windows 11
it’s highly recommended to Update Windows Defender regularly to ensure that it can detect and stop the latest threats. Here are steps on how you can update Windows Defender:
- Click on the Start button on the taskbar.
- Type “Windows Security“
- Click on the “Windows Security” app in the search results.
- Look for the “Virus & threat protection” section on the home page.
- Click on “Protection updates” under “Virus & threat protection updates.”
- Click on “Check for updates” under “Protection updates” section and click on “Check for updates“.
- Windows Defender will automatically check for updates and install them if there are any available.
- Once the update is complete, Windows Defender will display a message “Update successful,” indicating that it is up to date.

Why Use Windows Defender?
It’s a free program built into Windows 11, so you don’t have to install any additional software. It also provides real-time, cloud, and Tamper protection against malware and viruses.
It can also protect files and folders from unauthorized changes. Microsoft regularly updates the Program to ensure that it can detect and stop the latest threats.
FAQs
Q: Is Windows Defender enough to protect my computer? A: Windows Defender is a good antivirus program, but it may not be enough to protect your computer from all threats. It’s always a good idea to use a layered approach to security, including using Windows Defender and other security measures like firewalls and safe browsing practices.
Q: Can I use Windows Defender along with another antivirus program? A: It’s generally not recommended to use two antivirus programs at the same time, as they may conflict and cause issues on your computer. If you want to use another antivirus program, make sure to turn off Windows Defender first.
Q: How often should I scan with Windows Defender? A: It’s recommended that you perform a quick scan at least once a week and a full scan at least once a month. You can also schedule scans to run automatically regularly.
Q: Can I exclude files or Folders from Scans in Windows Defender? A: Yes, you can exclude specific files or folders by following the steps explained in this article.
Q: How do I know if Windows Defender is up to date? A: You can check section 10 in this article. If there are any updates available, Windows Defender will automatically install them for you.


is Windows Defender enough for my pc, can it perform as other antivirus programs?