System Cleanup can help improve the performance of your computer by removing unnecessary files and programs that are clogging up your system. This can help speed up your computer, improve its overall performance, and make it more responsive.
System Cleanup can also reduce the risk of malware on your computer by removing malicious programs and files that may have been downloaded in the past. This can help protect your system from being infected with malware in the future.
Windows 11 cleanup can be performed manually and automatically.
1- Manually windows 11 System Cleanup
Select Start > Settings > System > Storage > Cleanup recommendations.

Then Select See advanced options

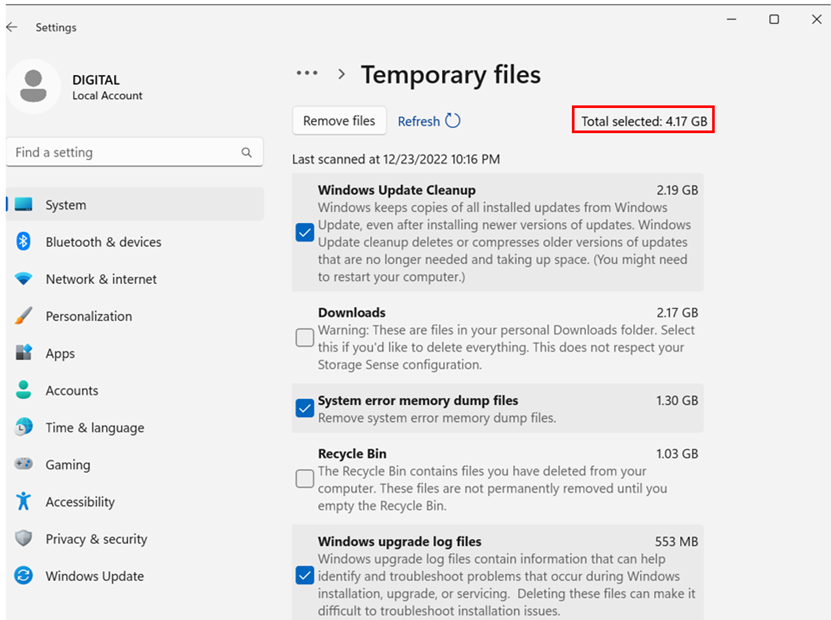
Select files you’d like to remove. Windows will suggest files for you and show the amount of space you’ll save when you remove those items, also it shows at the top the total selected space you’ll save.
By default all files are selected except Downloads files and recycle bin, i recommande selecting also recycle bin files and keeping the Download files unselected, except if you want to delete those files.
Note: If it’s been fewer than 10 days since you upgraded to Windows 10, your previous version of Windows will be listed as a system file you can delete. If you need to free up drive space, you can delete it, but keep in mind that you’ll be deleting your Windows. old folder, which contains files that give you the option to go back to your previous version of Windows.
If you delete your previous version of Windows, this can’t be undone. (You won’t be able to go back to your previous version of Windows.)
After you’ve selected items to remove, select Remove files button for each section, a Popup notification message will request Remove files confirmation, and all selected files and data will be permanently deleted.
Select Continue to confirm the delete operation

Once finished, the screen show Finished temporary files cleanup

2- Automatically windows 11 System Cleanup
here’s step by step on how to set up your windows 11 to automatically cleanup system
Go to Settings > system > Select Storage

Enable ON Storage Sense in storage management.
This option keeps windows running smoothly by automatically freeing up hard disk space for you by deleting temporary system, app files, Recycle bin, and user content.

Select Storage Sense to open more settings
- Enable cleanup of temporary files, this option automatically cleans up temporary system and applications files.
- Enable On Automatic User content cleanup when disk space is low.
Storage Sense default setting will not delete items in the Downloads folder and OneDrive (or another Cloud provider) unless you change the Storage Sense setting.
The default setting will clean up unnecessary temporary files and Recycle Bin content only when disk space is low.

To Configure cleanup schedules settings:

cleanup schedules settings options:
Run Storage Sense: Select when you want Windows 11 to run the Storage sense:
- During low disk (default setting)
- Every Month
- Every Week
- Every Day
Delete files in my recycle bin in they have been for Over:
- 60 Day
- 30 Days (Default setting)
- 14 Days
- 1 Day
- Never
Delete files in my Downloads folder if they haven’t been opened for:
- Never (Default setting)
- 1 Day
- 14 Days
- 30 Days
- 60 Days


1 Comment